Summer is in full bloom—nature is bursting with colors, textures and tiny wonders waiting to be captured. Whether it is vibrant blossoms or subtle plays of light, macro photography lets you preserve these details up close.
No matter what time of year you go hunting for small motifs: This guide will show you the technical requirements and provide you with inspirational macro photography tips. Even without dedicated gear, you can still stage close up flower pictures beautifully with smart composition and good light.
- The Right Gear for Macro Photography
- Taking Macro Pictures of Subjects at Ground Level
- Composing Your Macro Pictures
- The Technical Side of a Close Up Photo
- Controlling the Aperture in Macro Photography
- Focusing Correctly in Macro Work
- Achieving Full Sharpness
- Checking Sharpness on Site
- Which Camera Mode is best for Macro Photography?
- Useful Accessories for Macro Photography
- Macro Pictures Indoors
- Extraordinary Close Up Shots
The Right Gear for Macro Photography
They are beautiful—but tiny and close to the ground. Sure, you can always shoot flowers from above, but that angle rarely captures their full beauty. Anyone who has tried to photograph tiny spring blossoms reaching toward the sun knows how important it is to shoot from a low angle. To get a frame-filling composition, you must get very close—as the term “close up photography” already reveals.
It may look funny, but experienced macro photographers often lie flat on the ground to find the perfect perspective. A mat to protect your clothes from moisture and dirt is part of the standard setup for committed flower photography. If lying down is not ideal for you, a camera with a tilting or swiveling monitor can be a real advantage: It lets you frame the subject while shooting your flower close up from a crouched position.
Taking Macro Pictures of Subjects at Ground Level
Owners of compact and superzoom cameras have an advantage when it comes to macro photography: Often, all it takes is activating the macro mode on your camera in order to get as close as a few centimeters to your subject. But a closeup shot like this is only possible when using the wide-angle setting. As soon as you zoom in, you must increase the distance to your subject.
The drawback of the wide-angle setting is the wide angle of view. Although you are very close to your subject, you can still see a lot of the surroundings. In close up photography, it is therefore especially important to pay attention to the background of your picture. Using a longer focal length narrows the angle of view, which allows you to isolate your subject and eliminate distracting elements more easily. If you are capturing very small objects, a single flower may still appear too small in relation to the overall image size. Sometimes, even zooming in is not enough—especially when the camera’s minimum focusing distance limits how close you can get to the object. In such cases, accessories like close-up lenses, attached to the front of your camera lens, can help. Affordable tools like that are great additions to your macro photography setup and will help you to take your pictures to the next level.
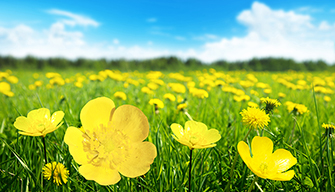 | 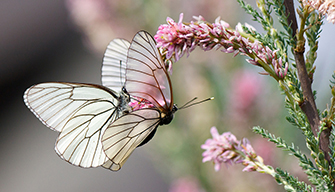 |
| Wide-angle mode: A beautiful environment can always be part of your picture to complement the subject. A low camera angle and an image composition according to the Rule of Thirds create interesting macro pictures. Here, the three-color rule was applied as well. | Flight distance: When photographing insects, a longer focal length is preferable. While aperture and shutter speed control sharpness, your focus point also has to be precise. |
If you use a DSLR or mirrorless system camera for macro photography, you will find that regular lenses cannot get close enough to tiny subjects. Some zoom lenses offer a macro setting, but that is often not enough. With the use of close-up lenses or a macro converter—inserted between the camera body and the lens—you can upgrade your macro pictures affordably. However, for macro enthusiasts, a true macro photography lens is essential.
Though more expensive, macro lenses are specifically designed for extreme close up photography and offer superior image quality. They come in various focal lengths: Whether a 60mm or 100mm macro lens is better for you depends on which subjects you prefer to photograph. The shorter the focal length (smaller mm specification), the closer you have to get to the subject. This can be an issue with insects, which may flee when approached—hence the term “flight distance”.
Longer focal lengths allow for a greater distance, making shots of animals more successful. Another benefit: You are less likely to cast a shadow on your subject with your own body or your lens.
Composing Your Macro Pictures
Before we dive into technical details, I would like to encourage you to simply go out and take pictures. Especially for beginners, gaining experience is the number one of all macro photography tips because a trained photographic eye only develops over time. The way in which you shoot your macro photo—from documentary to artistic—depends on your intent: Do you want to highlight a botanical detail, create an artistic impression, or both?
 |  |
| Branches with blossoms can be tricky to photograph: Background twigs easily become distracting, or parts of your subject might fall outside the depth of field. Start with simpler subjects or frame your macro pictures tightly. | Do not shy away from backlighting. Take a macro photo shot from different angles to get a feel for the lighting situation and how it affects the mood of your closeup shot. In macro flower photography, backlighting can create stunning, luminous effects that add depth and warmth to your images. |

Light: Take a look at how the subject you want to photograph is illuminated. Perhaps there is a small ring of light at the edge of a leaf that makes your flower close up particularly interesting. Take advantage of situations in which backlighting makes the delicate, often translucent flowers glow.
Perspective: Move around your subject. Shooting from multiple angles brings visual variety and changes how the light and background appear. Avoid including distracting surroundings such as bare soil or clutter next to your main subject. Try shooting from above, from the side, or even from a frog’s-eye view if possible. A daisy seen from underneath is far less common than one photographed from above. These unexpected angles make for attention-grabbing macro photos.
Image section: Creating a frame-filling image is a core principle in classical macro photography. This simply means your subject, e.g. the flower, should take up most of the picture. If you do not have a macro camera setup yet, start practicing with larger flowers. Your camera offers different aspect ratios that you can either use directly when taking photos or later in post-processing. Here, you can experiment with square (1:1) or wide (16:9) formats. Try to shoot your flower close up in different image formats in vertical as well as horizontal versions.
 |  |
| If your main subject cannot fill the frame, there are other creative options. In this example, circles of light add a compelling effect. | Use the Rule of Thirds, color contrast and different image formats to provide variety in macro flower photography. |
Composition: As with other types of photography, macro photography benefits from classic compositional techniques. Dividing the image according to the Golden Ratio and the Rule of Thirds makes your macro pictures more interesting. While flowers often seem suited for centered compositions at first sight, you can also consider shifting them slightly off-center. Crop in tighter, until the blossom fills the entire image or zoom out to include two or three blooms arranged behind each other. With sharp focus and a pleasing depth of field, this can add a three-dimensional feel to your flower photography. If you want to really document nature in your close up flower pictures, you can also integrate the surroundings to show where the flower grows and how it fits into its environment.
 |  |
| Three common mistakes: The autofocus has missed the main subject. Also, the distracting background is not ideal for a shot from this perspective. And the lighting situation in general is not very appealing. A small, foldable gold reflector could brighten shadows if the rest of the frame is strong. | Flower photography trick: Position a black piece of paper behind a flower to simulate a studio setup. For proper exposure, meter on the flower using spot metering or negative exposure compensation. |
Think in Series: When looking for motifs, you can use colors as a guide: Red flowers, yellow flowers, purple flowers, etc.. Work with classical color contrast: red-green, yellow or orange in contrast to blue. A yellow flower in front of a blue wall or shimmering water surface is visually striking. Develop a concept to intentionally break the rules: For example, you could shoot all circular flowers directly from above, perfectly centered. While such closeup shots may lack impact on their own, a combined grid of nine identical square macro pictures can have a completely different effect.
The Technical Side of a Close Up Photo
Sharpness is the biggest challenge in macro photography. To ensure that your macro pictures are sharp and avoid blurring, the exposure time must not be too long. Since many macro subjects do not move, most macro photographers rely on tripods. This allows you to take photos with a low ISO value and stop down the aperture without blurring.
If your subject moves, like a butterfly or bee, even with a tripod you will still need fast shutter speed to avoid motion blur. On windy days, even more caution is advised: Slight movements of the subject can blur it in a macro photo if the exposure time is too long. However, sometimes this is also used creatively for painterly effects. As a rule of thumb for blur-free images, the exposure time should be shorter than the reciprocal of the focal length used, i.e. 1/100 s for 100 mm. An image stabilizer in the lens or in the camera is very useful when working without a tripod.
Classic macro photography is easiest when you have good lighting conditions, i.e. plenty of light. Fast shutter speeds like 1/500 or 1/1000 sec freeze movement and minimize blur. In bright light, you can easily take hand-held photos. This results in perfect conditions for spontaneous close up photography. Still, avoid to chase insects around. The best strategy is to find a spot that both you and the insect like and then wait for the insect to land in just the right place to capture it with your camera.
 |  |
| Selective focus: Use your aperture to control the depth of field. Focus on the main subject, while the depth of field zone expands in front of it and behind it. A wide aperture (small f-number) results in shallow depth—sometimes too shallow for macro photography. | When taking close up flower pictures with insects and working with a tripod, determine the image section and the camera settings in advance. Then you have to wait for the animals to settle on the flower and can shoot perfect macro photos. |
Controlling the Aperture in Macro Photography
The second critical factor for image sharpness is precise focusing. For any camera, always double-check that your autofocus is focussing on the correct spot. It often misses slightly, focusing on a stem or the background rather than the main subject. On most cameras, there is an autofocus mode which you can choose. By default, many cameras work with an AF control that uses several metering fields. As a result, it depends on the camera what it focuses on. This technique can quickly go wrong in close up photography.
To improve your results, switch to single-point AF and place the focus exactly where you want your macro photo to be sharp. For macro photography of still subjects, manual focus is a great alternative.
Focusing Correctly in Macro Work
The third challenge is to manage your depth of field. The aperture setting on your lens determines how far the depth of field extends, i.e. how much of the subject is in focus. The smaller the aperture (higher f-number), the more depth of field you will get. In wide-angle mode, images tend to look sharper overall—but that is not always ideal.
Many macro pictures benefit from selective focus, where the subject is crisp and sharp, while the background is blurred. As soon as you zoom in or use a longer focal length, the depth of field zone is reduced. In macro flower photography, this effect is especially striking, but it requires extremely accurate focusing.
Fast lenses allow you to open the aperture wide. Low aperture values of 2.8 indicate an open aperture: this means that the depth of field zone in the image is very small. In macro photography the use of an open aperture is often critical. Perhaps only the edge of a petal is really sharp, although you actually wanted the entire petal to be in focus. Then you should close the aperture. The imaging properties of a lens are optimal if you stop down 2-3 stops, e.g. use f5.6 instead of f2.8.

Achieving Full Sharpness
Even at maximum aperture, full sharpness across the frame is not always possible. In this case, you need to choose your focus deliberately. For completely still subjects, you can use a technique called focus stacking to ensure maximum depth of field: Capturing several macro photos with the same settings but slightly different focus points, then merging them in post-processing—a job for tinkerers.
Checking Sharpness on Site
Many cameras have a depth-of-field preview button. This allows you to check the aperture effect already in the viewfinder. It takes a bit of practice as pressing the button temporarily darkens the subject. If your camera does not have this feature or you find it difficult to use, you should review your macro pictures on the camera screen after taking pictures. Zoom in on the key focus area and have a look at whether the focus is correct. Only in magnified view it is possible to assess sharpness reliably on your camera monitor during a close up photography session.
Which Camera Mode is best for Macro Photography?
Experts often recommend manual mode (M). Here, you control every parameter, but you must also ensure proper exposure. Beginners can start with Av/A mode. As soon as you close the aperture (large f-number, small aperture, more depth of field), the exposure time increases. The camera also increases the ISO value if this is set to automatic.
In Program mode (P), the camera usually selects an open aperture and increases the ISO value in order to achieve blur-free exposure times. In Tv/S mode, you control the exposure time. This means you only have an indirect influence on the aperture and cannot adjust the depth of field precisely to the subject.
No matter which mode you use: Always keep an eye on the camera parameters in the viewfinder or on the display. Aperture and shutter speed matter more than ISO. A slight amount of noise can be corrected in post production, but camera shake (as a result of the exposure time) or a lacking depth of field (as a result of the aperture) can not.
 |  |
| AF control: Use a single autofocus point or adjust the distance manually. | In M mode, you have to adjust all settings yourself. Regardless of the mode, you should always keep an eye on the combination of exposure time and aperture. |
Useful Accessories for Macro Photography
Close-up lenses (diopters) come in various strengths and are screwed onto the filter thread of a standard lens to enable magnified images. The number of diopters indicates the magnification factor: A +3 diopter magnifies more than a +1 diopter. Extension rings, attached between the camera body and the lens, are another option. In contrast to close-up lenses, their lens-free design does not affect the quality of the lens. If you are not sure whether macro photography is right for you, these accessories are an inexpensive way to get started. On compact cameras, close-up lenses are the only way to get closer to the subject.
Reverse rings are also mounted on the camera body, but the lens is attached to the front (in “retro position”). This looks unusual and may intimidate some camera owners since the part of the lens that normally disappears into the camera body is now exposed and pointed at the subject. Working with reverse rings is tedious because you cannot focus as usual: The focus can only be adjusted via the shooting distance, which is not very convenient. You also have to be extra careful with the surface of the lens when using this setup and avoid dirt on the rear glass lens.
 |  |
| Close-up lenses like those from Raynox are a cost-effective alternative to a dedicated macro camera lens. They can also be used on some compact cameras. (Image credit: Raynox). | Reverse rings are inserted between the lens and the camera body. The optical quality is better than with a close-up lens, but the transmission of electronic signals to the lens is not always guaranteed. Ask a photo specialist for advice. (Image credit: Tinxi) |
Using flash in macro mode is usually not a good idea. The camera is too close to the subject so that the built-in camera flash often overshoots the subject or casts a shadow due to the lens barrel. The only solution here: Zoom and flash. Then the light hits the subject, but the lighting mood is often modest. This is why there are special macro flash units for close up photography. They are attached to the lens and usually connected to the camera’s hot shoe with a cable. The light of LED attachments is not as bright, but they are an inexpensive solution. One advantage is that LED lights offer continuous light, so you can preview how your subject will appear. In contrast, with a flash you can only judge this afterwards.
Small reflectors, fitting into every photo bag, also help you to bring beautiful light accents to your subject—especially in bright conditions. Even on cloudy days, you can use a reflector to bring some light into the shadow areas of a subject. Gold or silver foil reflectors can even be handmade and tucked into your camera bag. Just be sure the surface is not too glossy, otherwise the light reflections may become too strong.
 |  |
| A tripod with a reversible center column lets you shoot close to the ground. (Image credit: Manfrotto) | LED instead of macro flash: With the battery-powered attachment, you get continuous light to illuminate your subject. (Image credit: Delamax) |
Tripods are normally built for shooting from chest or eye level. For macro subjects near the ground, you need a tripod with a flexible or reversible center column. Small cushions, so-called bean bags, are a convenient alternative. When using a tripod, switch off image stabilization. On DSLR cameras, the mirror lock-up function prevents vibrations.
A remote shutter or self-timer helps with touchless triggering. If using Live View, the mirror is already raised. But keep in mind that power drains faster, so you should have a spare battery with you.
Macro Pictures Indoors
Macro photography is often associated with flowers and insects. Both are mainly found outdoors, but there is nothing to stop you bringing your subjects indoors. On a balcony or windowsill, you can sit comfortably and work more easily than while lying in a flowerbed.
If sharp focus remains difficult, try the opposite. Many people love soft, dreamy images. Create diffuse areas of color where the subject is barely visible. Use creative filters or camera effects, e.g. the toy camera mode. This alters focus zones and colors in interesting ways. Black-and-white flower photography can also create graphic, stylized results. The only disadvantage: With most cameras, the color does not come back when you set B/W. Decoloration in an image editing program is the better choice as you can control the conversion more finely. You can also try gimmicks like selectively desaturating areas in an editing software to guide the viewer’s attention.
Discover the possibilities of your camera and do not let anyone tell you that a “serious photographer” does not work like this. The only important thing is that you like your results in the end. And anyway, the best macro pictures are the ones that speak to you.
 |  |
| Miniature figure tone on tone: Backlighting and a slight overexposure create a diffuse atmosphere. The figure is positioned in the golden ratio. | Clouds reflected in hanging drops of water. With a macro camera lens, small things become something really special. |
Extraordinary Close Up Shots
Macro photography does not necessarily have to mean photographing flowers. There are countless everyday objects, which are so small that you can only capture them through macro photography. I love flowers, but I rarely use my close up photography settings for nature subjects. Tiny air bubbles in a glass of sparkling water, shimmering crystals from a lamp in the living room, toy figures, or completely ordinary household items: Looked at closely, they turn into aesthetic or quirky subjects. Even a kitchen drawer can become an adventure playground for an extraordinary closeup shot. Once you start paying attention, you will see that the world is full of photo opportunities.
Have fun discovering the micro- and macrocosm!
Turn your photos into something special!

Wall Art in Different Formats
Turn your favorite photo into a real eye-catcher as wall art! With or without frame, as a poster print, canvas, or on another material—explore all the possibilities!

Turn Your Photo into a Wallpaper
Create a beautiful photo wallpaper with your favorite landscape picture and enjoy that special view every day—but in your own home.

Your Landscape Photo, in Full Panorama
With a panoramic print, you can take in your favorite landscape in full, almost as if you were standing right in front of it. Your favorite place, always in sight.