Mountain landscapes offer moments of breathtaking natural beauty—from dramatic sunsets and vibrant flower meadows to fog-covered peaks. This guide will teach you how to capture those scenes through landscape photography and how to improve your nature photography skills. Whether you are just getting started or among the growing number of passionate landscape photographers, our tips will help you master the art of photographing unique landscape pictures.
- Landscape Photography: Tips for Your Photographic Equipment
- Other Essential Equipment for Mountain Photography Trips
- Weather Forecast for Nature Photography
- Why Waking Up Early Pays Off in Mountain Landscape Photography
- What Time of Day is Best for Nature Photography?
- Focal Length & Lens Choices for Mountain Landscape Photography
- Varying Your Shooting Angle in Landscape Photos
- Choosing the Foreground for Stronger Landscape Photos
- Integrating People or Objects in Landscape Photography
- Nature Photography at Mountain Lakes
- Tips to Present Your Beautiful Landscape Photos
Landscape Photography: Tips for Your Photographic Equipment
When it comes to your camera, there is little you can do wrong these days. Modern digital cameras are more than capable of capturing stunning landscape pictures. The most important feature is manual control over aperture, shutter speed, and ISO. If this is the case with your camera, you are ready for impressive outdoor photography in the mountains!
Your lens, however, will make a bigger difference than the camera body. So it is a better idea to invest in a high-quality, fast lens than in a new camera. But which one is the ideal lens for photographing mountain landscapes? In landscape photography, you often want to capture as large a section of the scenery as possible. This is best achieved with a wide-angle lens.
For an APS-C camera, a focal length of 10 to 24 mm is ideal for perfect landscape photos, with 10 mm already considered ultra wide-angle. For a full-frame camera, the focal length range should be between 14 and 35 mm. This difference is due to the crop factor, which results from the different sensor sizes of the cameras. However, a longer focal length can also be interesting for compelling mountain landscape photography—especially if you want to bring mountains closer and capture them in isolation.

You should also consider whether a prime lens or a zoom lens works better for your needs. In general, prime lenses have a larger maximum aperture. This results in a shallower depth of field, and more light reaching the sensor. Accordingly, this allows you to select a faster shutter speed. This is particularly advantageous in twilight situations when you are not using a tripod, so perfect for early morning nature photography. On the other hand, it is not possible to zoom in and thus change the image section without moving yourself when using a prime lens. There is no right or wrong here. Everyone has to find out for themselves what works best for their needs in outdoor photography.

Other Essential Equipment for Mountain Photography Trips
If you are heading into the mountains, in addition to your nature photography gear, you should definitely bring the following items:
- Backpack
- Hiking boots
- Rain jacket
- Sunglasses
- Trekking poles (especially recommended for demanding hikes)
- Headlamp
- Map or hiking app with offline functionality
- Phone for emergencies
- Small first-aid kit (including blister plasters, bandages, medication for insect bites, etc.)
- 2–3 liters of water per person per day
- Cash
Your clothing when taking landscape photos in the mountains should be as breathable as possible and should not restrict your freedom of movement. It is best to dress in layers and make use of the “onion look”. Layering several thin items of clothing is better for your trip to the mountains than one thick jacket. On the one hand, this insulates much better, and on the other hand, you can take one or two items off or put them on again if the temperature changes.
Tip: You often dress far too warmly before starting your hike and then take off a layer after the first minutes already. Therefore, experienced hikers start their hike feeling slightly cold—you will warm up quickly anyway!
If you are planning a multi-day hike for nature photography, you should also take the following items with you:
- Tent or bivy bag
- Sleeping bag for cold temperatures (Your sleeping bag should have a comfort zone between 0 and 4 degrees Celsius, as it can get very cold in the mountains at night, even in summer)
- Sleeping mat
- Camping stove and 2 lighters, cutlery and crockery
- Toiletries such as toothbrush and toothpaste

Especially for overnight tours, pants with detachable legs are a good investment. During the day, when it is warm, you can remove the legs. After sunset, when it gets cold, you can wear long pants again. This way, you only need one pair of pants and save weight.
Before packing everything you need into your backpack, take another look and ask yourself: “Do I really need this?” Be a bit strict with yourself and try to keep your equipment to a minimum. Mountain landscape photography is about the experience—and this does not depend on your amount of luggage.

Weather Forecast for Nature Photography
Before starting your hike into the mountains, you should check the weather. Monitor the forecast (especially radar) to get a rough idea of the expected weather. At the same time, you should still be aware that mountain weather can change quickly and unpredictably—sometimes to your advantage, sometimes not. Sudden temperature drops are not uncommon.
But bad weather does not necessarily mean bad weather for nature photography. Especially in fog, you can encounter spectacular situations. Clouds can add life and emotion to your mountain pictures and make colors pop in your landscape photo compositions. So do not shy from outdoor photography in less-than-perfect weather since poor conditions often lead to exceptional results.
However, it is recommended to avoid demanding hikes with exposed sections in bad weather conditions, as wet ground can quickly become dangerous. When thunderstorms approach, the mountains are not a good place to be, as the risk of lightning is significantly higher at altitude—stay safe and plan accordingly.

Why Waking Up Early Pays Off in Mountain Landscape Photography
One thing is clear: If you want to take the most beautiful landscape photos, you have to get up early! Let us be honest, sunrise shots are simply the most beautiful. The reason: At sunrise (and sunset), the light is best. The color temperature is pleasantly warm, and the clouds are bathed in reddish-yellow colors. What is especially striking for mountain pictures is the moment when the sun has not yet reached your location but is already illuminating the mountain peaks, casting them in a lovely orange light.

If you want to photograph the sunrise, it is wise to already arrive the night before. That way, you do not need to get up at midnight to reach your desired location on time. You can also take mountain pictures during sunset the evening before and then spend the night on the summit. There are rustic mountain huts for this, but you can also spend the night in a tent or even under the open sky if you are feeling adventurous.
This gives you the chance to take spectacular landscape photos and experience something truly special you will remember for a long time. However, if you want to camp in the wild, you should check the local regulations beforehand as it is not legal to camp in the wild everywhere.

Ideally, photograph the sunrise or sunset both with the sun at your back (so the mountains in front of you are illuminated) and facing the sun. The latter is more difficult because the sun is extremely bright, which can lead to underexposure in the rest of the image. But if done right, it can add incredible energy to your mountain pictures.
Tip: When photographing against the sun, close the aperture (high f-number, e.g., f/22) to create a “starburst” effect where the sun appears with defined rays—a hallmark of advanced landscape photography techniques.

What Time of Day is Best for Nature Photography?
Timing is everything in mountain landscape photography. On a hiking trip with your family, you are usually out during the day and want to take photos then. But for special outdoor photography, try to take pictures during Golden Hour or Blue Hour—this gives your mountain pictures a completely new character. Contrast, color, and atmosphere change dramatically, allowing you to capture truly beautiful landscape photos.
The Golden Hour is the period right after sunrise and right before sunset: During this time, the sun is low, casting long shadows, giving the landscape an exciting sense of depth. The light is soft and golden-orange.
In contrast to this, the Blue Hour is the twilight just before sunrise and just after sunset when it is not yet fully dark. The landscape is bathed in deep blue tones, creating a mystical atmosphere.
Nature photography thrives during these hours. They bring out colors, reflections, and details which midday light often flattens.
Focal Length & Lens Choices for Mountain Landscape Photography
The focal length of a lens defines how large the image section for your picture is. With a wide-angle lens (e.g. 18 mm), the image section is large, whereas with a telephoto lens (e.g. 200 mm), the image section is small.
A wide-angle lens makes the foreground appear larger and the background appear smaller, giving a sense of spaciousness to your nature photography. In contrast, a telephoto lens compresses the image. It captures less, but in greater detail.
Landscape photographers always have to consider what they want to depict. The key to an amazing mountain shot is to deliberately compose a landscape photo and choose the right focal length accordingly.
Therefore, play with the focal length and take several shots from the same position using different settings. Even though your standpoint remains the same, the landscape picture can change dramatically.

Varying Your Shooting Angle in Landscape Photos
Composition and perspective are essential for landscape photography techniques. Do not hesitate to deviate from the habit of taking landscape pictures from standard shooting height (head height). Instead, sometimes try to kneel down and take a landscape photo from this point of view. You can also do the opposite: Climb a small hill or use a drone to photograph a subject with your camera from above. The same location can look completely different depending on height and focal length. Just try it out! Thanks to digital photography, you can experiment freely—in the worst case, you only have to delete one more image afterwards.

Choosing the Foreground for Stronger Landscape Photos
Another important tip for mountain landscape photography: Compose your landscape photo intentionally and look for an interesting foreground. Alpine flowers are ideal for this, as they add that special something to the image. If you open the aperture, meaning you use a low f-number (e.g., f/1.8), the foreground will appear blurry. If you do the opposite and use a closed aperture (e.g., f/22), the entire image will be in focus. Of course, you can also focus on the foreground and deliberately blur the background. Depending on the motif, every technique can create beautiful landscape photos.

Integrating People or Objects in Landscape Photography
Integrating people, houses, paths, or similar elements makes landscape pictures more engaging. It shows the size and majesty of the mountains. A lone figure makes the vastness of the mountains even more tangible. With a reference point like this, the scale of the mountain landscape becomes easier to grasp.

Tip: Do not place the subject in the center of the image. Instead, use the so-called “Golden ratio”, a basic principle in nature photography. The Golden ratio is also known as the “Rule of thirds”. First, you divide an image into 9 equal rectangles and then place the subject at one of the four intersection points.

For detailed tips on how to apply the Golden ratio and the Rule of thirds, check out our article on the Golden ratio in photography.
Nature Photography at Mountain Lakes
Few things are as magical as landscape photography at a mountain lake. The clear water reflects sky and mountains, creating beautiful landscape photos that feel surreal. Seek out these idyllic scenes to capture these beautiful reflections in your mountain pictures.

Tip: Mountains are reflected not only in lakes. The sunglasses of your hiking partner also work perfectly for a creative reflection.
Each alpine lake is unique and fascinates with its colors and surroundings. If possible, visit the same place more than once—you will encounter it differently every time. The mood in the mountains is never the same. Not only do seasons change the appearance, but also the time of day and the weather in general.
At mountain lakes, also test out different angles and shooting heights. Moreover, you can include people or objects in your images to create fascinating and unique landscape pictures. A three-legged tripod can help you stabilize your camera on uneven ground.
Tip: If you are just starting with outdoor photography, get familiar with your camera before heading into the mountains. Think about how to set your camera in different shooting situations in advance. That way, you will not miss any shots. Browse through our magazine articles on photography and photo editing—you will find many more landscape photography techniques and tips for successful nature photography.
Tips to Present Your Beautiful Landscape Photos
Once you have captured your dream landscape pictures, it is time to showcase them. Landscape photos of mountains, sunsets, sunrises or mountain lakes look fantastic when printed large as panoramic photo prints.
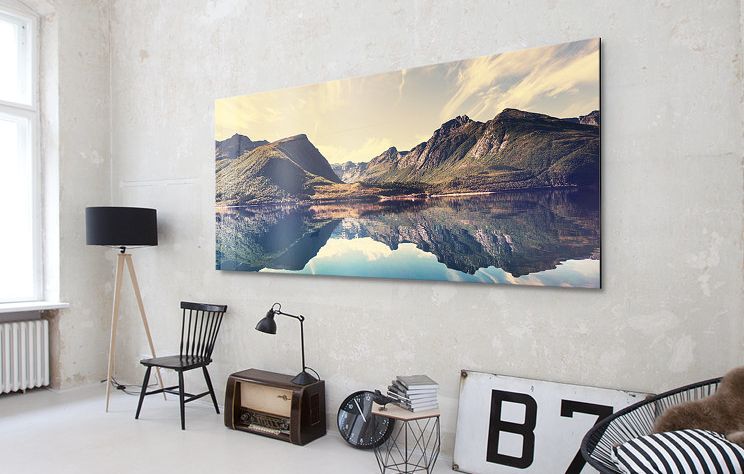
Pictures with vibrant colors and strong contrast really shine on Hahnemühle paper, which displays them in an exceptionally realistic way. You can almost feel the fresh mountain air again when looking at the print at home.
On acrylic glass, nature photography also looks especially vivid and detailed—this type of material is available in many different formats, from small to large. That way, your memories become truly tangible!
If you want to present your mountain pictures in a large format, we recommend gallery bond prints. With this elegant acrylic glass option, your fine art print is mounted on a stylish and durable Alu (aluminium) Dibond backing.
Do you prefer to collect your vacation memories in a photo book? We got you covered: Landscape photos and panoramic images look amazing in a premium photo book on real photo paper, spread across a full two-page layout. That way, you can flip through your memories anytime and travel back in your mind.
Turn your photos into something special!

Wall Art in Different Formats
Turn your favorite photo into a real eye-catcher as wall art! With or without frame, as a poster print, canvas, or on another material—explore all the possibilities!

Turn Your Photo into a Wallpaper
Create a beautiful photo wallpaper with your favorite landscape picture and enjoy that special view every day—but in your own home.

Your Landscape Photo, in Full Panorama
With a panoramic print, you can take in your favorite landscape in full, almost as if you were standing right in front of it. Your favorite place, always in sight.